| ABOUT | PRODUCTS | RESEARCH | BLOG | COMMUNITY |
|
|
Trail and Its Effects | Track Set Up | Shimmy | Bicycle Geometry for Big Riders | Compact Frames
Head angle:The angle described between the ground and the steering axis. Trail:The distance between the front wheel contact point with the road and the imaginary point where the steering axis meets the road. As a general rule when dealing with 700-C wheels, a trail of about 56mm will give a frame set "neutral" handling. My use of the term "neutral" here refers to two things. First, neutral handling means that a frame set will respond to steering input in the same manner no matter what speed the bicycle is traveling. Second, while cornering, a neutral handling bike will have neither a tendency to climb out of a turn nor have a tendency to dive into the turn, it will simply hold the line that the rider sets up unless further rider input is applied. Decreasing trail below the neutral range has a couple of effects as you might expect. The first thing a rider will notice about a low trial bike is that it appears to resist attitude changes (lean angle changes). It requires more physical effort to get the bike to lean into a corner and more effort to get it to straighten up. The second thing that you will notice is that while cornering at higher speeds, the bike will have a tendency to climb out of the turn on its own. Finally, you will find that the way the bike responds to rider input is affected by the speed of the bike. As you might have guessed by now, at lower speeds, a low trail bike will have a tendency to want to go straight and do so pretty much on its own. What you will find at higher speeds (like over 30mph) is that a low trail bike will become quite vague in the front end. The front wheel will feel as though it is wandering a bit and the contact patch feel will simply go away. Increasing trial above the neutral range will cause opposite effects for the most part. At lower speeds, handling response will be light and consequently, attitude changes will be much easier. During cornering, the bike will have a tendency to drop into a tighter arc than the rider might have intended. Finally, speed's effect on handling is reversed. While low speeds give a light feel during handling maneuvers, high speed sets up a very solid front end feel. Although high trail frame sets give safer (more inherently stable) handling than low trail frame sets do, high trail frame sets are still inconsistent in the way they respond to rider input. Interpreting from the basics above you can see why we usually aim for neutral trail. It does not require the rider to consciously hold a bike down during hard cornering, nor does it require different rider input depending on changing speeds. For some frame designers though, it is not always that simple. For example, look at the way Eddy Merckx designs most of his frames. He usually uses less trail than the "ideal" as he did much of his racing on the pave and likes the way a low trail frame tracks under really horrible conditions. Granted, they do not act as consistently under a variety of speeds on good roads, but they really work on northern Europe's country tracks. When we are asked to build frames for either loaded touring or Randonneur riding, we need to use lower trail numbers to keep handling consistent even when extra weight is loaded onto the bike in front of the steering axis. The degree to which we change the trail numbers depends on both the additional weight being carried and the handling requirements of the rider. Track frames are a whole different thing though. If you would like me to, I can get into that. Let me know.
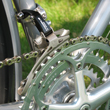
At Spectrum Cycles we design and build custom frames because it's the best way to set a rider up on a bicycle properly. This holds true for tandems, racing bikes, touring machines and especially track bikes. That said, here are some tips on how to set up your track bicycle. Setting up a track position is similar to setting up a road position except that the pelvis is generally a bit forward compared to a road position (not a lot, just a bit...like one cm. for a 5'7" rider) Saddle height (or leg extension at 6:00 O'clock) usually is a tiny bit lower as cranks tend to be shorter and typical crank RPMs are much higher. The drops of the bars should be a bit lower relative to saddle height (again not more than a cm. or so unless we are dealing with a tall sprinter). Reach (horizontal distance from saddle to hands in drops) is usually about the same as road reach. Note that I am talking about setup, not necessarily riding position. I mention this because in competition, a track rider's pelvis position reference points vary much more than the typical road rider's position does. Next time you watch a good race at your local velodrome, notice that at moderate speeds, most riders sit in their saddle in the "sweet spot" while at other times, during a hard chase or in a sprint, they "ride the rivet", sometimes for quite a few laps. Check out your videos of the track world's pursuit competition if you want to see what "riding the rivet" means. When setting up the bike for the track, consider the top-tube and stem lengths together as it is the relationship between and the sum of the two that affects handling. The relationship between top tube length and stem length will affect the road rider and track rider's center of gravity in the same way. However, because track bikes average much steeper head angles and shorter fork rakes than road bikes do, much more careful accommodation of this front center difference must be attended to during frame design. Generally, this comes down to a subtle shift in the typical top tube/stem length relationships. Compared to a well-designed road bike, track bikes should have a slightly higher top tube/stem ratio. Usually that means that your track bike should have essentially the same top tube length as your road bike, but it will have a slightly shorter stem. This does not apply to smaller track bikes as an already short stem will tend to have more of a "steering wheel" effect and should be avoided if possible. For those smaller frames, the top tube and stem length come down together. Seat tube length is another major consideration when setting up the track bike. The rule of thumb was always that your track frame should have a 1-2cm shorter seat tube than your road frame has. This rule works fairly well assuming your road frame fits you well. (Remember what I said in the position paragraph above.) The saddle to bar drop should be 1-2cm. lower than your road bike. If your road frame fits you pretty well, your 17 degree stem can go down a couple centimeters or your 0 rise stem is pretty much burred. Either way, increasing your saddle to bar drop by 1-2 cm. will usually require a shorter seat tube. Also, remember that your leg to saddle extension is a few mm. shorter which brings everything down a bit more anyway. Seat angle... Quite simple. Because we want to bring the pelvis forward a cm. or so, we bring the seat tube forward by about that amount. Depending on the bb to saddle distance, that can mean anywhere from half a degree to almost three degrees. Of course the rider's style and events effect all this stuff. These do work for the averages though. Chain stay length... Almost always, the chain stay length is as short as you can get it and retain tire/seat tube clearance. This usually works out to 15.125"-15.625" measured from the bb center to the center of the rear axle in its most forward position. The reasons to have the chain stay as short as possible are; the desire to keep handling, power transmission and jump as quick as possible, to assure that once the chain tension is adjusted correctly, the wheel stays as far forward as possible. In some cases, especially with larger track frames, we will actually crimp the back of the seat tube to enable us to shorten the rear end even further. Next question; type of track's effect on frame design:
Crimps... It is pretty rare that we can get away without using crimps on our chain stays. Most track riders do train on fairly wide tires (cheaper and longer lasting) and they do take up more room. Chain stays are the most "dimensionally challenged" tubes in the frame. The builder has to be sure that he can fit the right chain stay between both the tire and the largest expected chain ring (sometimes as big as a 53). We do try to keep the crimps as small as possible to retain as much torsional rigidity as we can. We do not oval our chain stays as that is ALWAYS less efficient from a mechanical perspective. On road bikes it is less critical, but on the track, every little bit of additional stiffness helps. Chain stay bridges... We always use them. Chain stay bridges do two things. First, they effectively shorten the chain stay length from a structural perspective, stiffening up the bottom bracket and rear end somewhat. Second, and more importantly, they dissipate the stresses on the chain stays where they enter the bottom bracket. It is exceptionally rare that we see chain stays that have cracked near the bb when there is a bridge while we see chain stays cracked just behind the bb all the time on frames that have no bridge. The trick here is that a chain stay bridge has a larger radius stress riser than most bb shell lugs and they are also more compliant. The only good reason to leave out a chain stay bridge is to save a few bucks. Remember, if you have a question about a track frame contact us. That's why we are here!
When it comes to high-speed downhills, nothing can frighten a rider more than instability in the front end of the bicycle. Most cyclists have experienced this at one time or another. So what's the deal? The issue of front-end wobble or shimmy is rarely as simple as a worn or poorly adjusted component. This kind of problem is quite common with bicycles, so I thought I'd take a few minutes to go through the most common causes of shimmy and also debunk some of the assumptions about the problem. First, you can make ANY bike shimmy if you do the right (or wrong) things. Even a perfectly aligned, perfectly adjusted, very stiff bicycle will shimmy under the right conditions. Of course, your bike is likely none of those things, but we will get to that. Second, in the majority of cases, there is more than one thing contributing to a shimmy. Usually, two or three things will combine to start the cascade of events. But ultimately, all shimmy results from structural oscillation. The natural structural frequency of the bicycle varies depending on the factors listed below. When these things combine to create the range of a shimmy (about 5-10 cps), the wobble can be started and sustained if the structural frequency is not changed. Note that I indicated that a shimmy CAN be started. Even when a bicycle is capable of sustaining a shimmy, it still requires an impetuous. This can be a quick shift in weight, bar movement, road surface irregularity, etc. Shimmy is rarely a "stability" problem per-se, but a structural problem. The use of the term structure in this case describes, not a structural part of the bicycle, but the entire structure including the bicycle and the rider. Longitudinal shear is the tendency of the structure to twist (or shear) along the directional axis of the bicycle. The stiffer the builder makes the frame in longitudinal shear, the more difficult it will be to initiate a shimmy because of the higher structural frequency. This twisting (or shear) in a cyclical fashion is really what shimmy is. Let's go through the list of the most common contributors to bike shimmy in their order of likelihood and potential effect shimmy:
The rider:
Speed:
Frame set Materials:
Last in the materials area is impending failure. As a tube or other part of a frame begins to fail, the frequency of the frame set drops dramatically. Indeed, impending failure has a powerful effect on frame shear modulus and thus affects shimmy potential the most of all the structural causes. Frame set Design:
As I mentioned earlier, the center of gravity can contribute to shimmy, and here I will deal with a frame design's effect on this. If a frame design positions the rider's weight too far forward, or it leaves him with too little reach, this will have a major effect on lowering the oscillation frequency of the structure. As a custom builder, this is one of my biggest concerns when designing frames for individuals, but it should be just as big a concern to someone shopping for a new bike. The head angle alone can also effect the structural frequency of the frame, but because this is rarely an issue for road bikes, it has only minimal effects on road frames and is pretty difficult to explain in 500 words or less, I think that I'll leave it at that. Even though this sounds like a materials issue, I will treat the choice of specific tubing and frame material as a design issue. As I mentioned earlier, the stiffer the builder makes the frame in longitudinal shear, the more difficult it will be to initiate a shimmy because of the higher structural frequency. Because tubing has its most efficient shear stiffness along its longitudinal axis, the most efficient way to stiffen the bike's torsional shear is to use a stiffer top tube. A stiffer down tube helps, but not as much as a stiffer top tube does. The weight of the entire structure also effects the oscillation frequency of the structure. To a point, the heavier bike/rider combination (all other things being equal) the more likely it is that the bike can develop a shimmy. As an example; heavily loading touring bikes will increase their shimmy potential. Road conditions:
Component problems;
Because a tight headset increases the effective mass of the bicycle structure by partially including the fork and front wheel in the frame's mass, it also increases the chance of shimmy. Another reason it causes the problem is that the tight headset increases the shear forces applied to the frame by not allowing the headset to absorb them. The tighter the headset, the more it affects shimmy potential. A slightly loose headset will negatively affect handling, but it will actually lower the tendency of the bike to shimmy. In the same way that lighter wheels help with shimmy, so do lighter tires. Nuf said. Keep in mind though; higher tire pressures do not dampen potential shimmy as well as moderate tire pressure does. There is NEVER a reason to run over 8 bar. in your road tires. Tracking and alignment:
Solutions:
Think back to our discussion of center of gravity and act accordingly. This means that you should try to keep your weight back as far as is reasonable during descents. This also means that you should be sure that your bars are not set for too short a reach. LIGHTEN UP! What I mean here is that you should make a real effort to loosen up your upper body in situations where a shimmy might occur. Let the bike take care of itself. Of course, this can be quite difficult to do as nervousness can bring on tightness. In cold weather, a rider's upper body WILL tighten up when it is cold. Make every effort to dress warmly under cold conditions and bring appropriate clothing if you expect cold conditions later in your ride. Even though lowered speed will help with a shimmy, getting slowed down is just the thing that will make it worse. Putting on the brakes will shift your weight forward AND stiffen up your arms. Making a quick decision on how to deal with a shimmy in an emergency is difficult and each situation is different. The final (and most effective) emergency tactic to end a shimmy is to either touch the top tube with one of your knees, or to clamp the top tube with both your knees. This will dampen the shimmy cycle. It does not affect the structural frequency itself, but it does dampen the structure. The human body is a wonderful dampening device. No Solution:
Bicycle Geometry for Big Riders
When a tall cyclist looks for a bicycle there just aren't that many options available. You can try a local bike shop but the chances are you and the dealer will quickly become frustrated. Stock frames just aren't designed for big riders so you can forget the fit kit run through. You are beyond the kit's realistic size limits anyway as they are designed to get a beginning cyclist into an entry-level bicycle. If you are serious about cycling and are a tall cyclist Spectrum strongly suggests you investigate a Custom frame. You may not buy it from us (even though we think you should) but Custom is still your best option. So what should big riders look for in a bicycle frame? Let's start with what they shouldn't do. They should not look for a frame that is simply a bigger version of a production frame. The reasons deal with strength and ride quality. As frames (and their tubes) get longer, the stresses put onto the tubes are increased not only because they are longer, but also because the rider is usually heaver and stronger. The tubes are also more highly stressed because the rider's weight is farther from the ground. Big production frames often simply beef up all the tubing to compensate. Simple beefing up of the frame tubes will cause the frame to lose its resiliency. Just as critical as expert material choices is the knowledge required to make a large frame fit and function as well as a standard sized frame. Simply expanding the size of the frame results in a frame that works like a truck. There are a myriad of adjustments that a builder must make to larger frames to make them work properly. Front-end geometry changes may be required to compensate for a longer wheelbase. Rear-center and front centers may require adjustment with changes in seat angle or rider center of gravity. While most large riders require shallower seat angles than smaller riders do, this is not always the case. Therefore getting fitted properly is critical. Keep in mind that small changes in seat and head angles have disproportionally large effects on larger frames. If you are confused or just have questions about fit, call us. After you've got the fit nailed down, you have to consider materials. For big riders who tend to eat equipment (you all know who you are) Titanium is an excellent choice. It stands up to abuse better than any material out there and it won't rust either. You can consider Aluminum and Carbon but both have serious drawbacks especially for a larger cyclist. If you are looking for a bicycle that will last longer than a few seasons, consider the fatigue numbers associated with aluminum. Aluminum frames accumulate fatigue over the miles. That fatigue will eventually result in failure. Another problem with many of the aluminum frames is their lack of vertical compliance. Aluminum frames offer a stiff ride but they do so at the expense of comfort. Carbon frames are often more comfortable than Aluminum but strength is a serious consideration. Under ideal conditions, composites offer significant weight to strength advantages. Some of the current composite frames on the market work very well. But the real world does not offer ideal conditions very often. If you are a rider who does not expect to crash, be hit by a car, or damage your frame, then carbon may be for you. For a larger rider, the biggest drawback to composite frames is their unavailability. There are one or two custom builders working in composites who can build large frames, but the sources for these frames are severely limited. In short, we suggest that tall cyclists look around for a while and consider options. If you are ready to buy a Custom Frame, we suggest Titanium for strength, durability and ride quality, and steel for its beauty, solid functionality and value. But take your time! If you should decide to go Custom and you choose Titanium, your search should be easy as there are only a handful of us out there. Talk to your riding friends to find out what they know about other builders, and give Spectrum a call if you want to find out what sets us apart.
Compact frames are developing a sizable following in the cycling community. As a compact frame owner myself, I appreciate the nimble liveliness afforded by the design. Like all bicycles, the handling characteristics of compacts starts with the geometry so let's take a look. In designing the our first compact prototype back in mid '98, we wanted to discover what if any the real world differences there would be between traditional and compact frame designs. Our first compact frame (still my favorite frame) was an exact replica of my then current titanium frame in materials and geometry save for the sloping top tube. I designed it with a severe (17 degree) slope to ensure that any differences would be as obvious as possible. We had assumed that the new frame would be somewhat stiffer and lighter. It was lighter (about 4 ounces) but it was not appreciatively stiffer. Although we were able to measure a slight increase in stiffness, it was too slight to feel. The big change came when I stood to accelerate or climb. As I stood up, the bike appeared to loose three pounds. The inertia of the bike as I rocked it back and fourth was reduced so much that I felt as though I was on a twelve-pound bike. Interestingly, when seated, a compact frame feels exactly like a traditional design. The compact design has no effect on handling beyond the increases responsiveness during climbing and accelerating. When considering a compact frame, take the time to check out the angles, the virtual tube lengths and how these consideration affect handling. If you need some advice give us a call. |


|


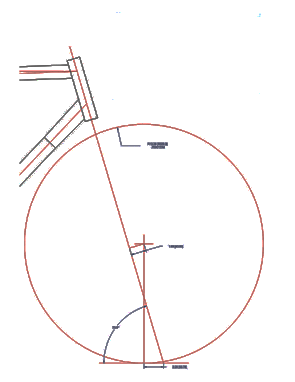 Fork rake:The distance that the front axle leads the imaginary line drawn through the center of the head tube (or steering axis).